Security Agent
Availability. The Security Agent is an on-prem enterprise feature
covered by thesecuritylicence module. Afuzzortesting
grant can also open the Scanners tab. The other six tabs need a
Security seat and appear in server installations.
The Security section is Mockarty’s umbrella for offensive security
testing. It combines the fuzzing engine (Scanners sub-tab) with an
AI red-team agent that runs five pentest personas, an approvals
queue for human-in-the-loop exploitation steps, a reports
catalogue with SARIF / VEX / HTML / PDF / Allure exports, and a
curated knowledge base that grounds the agent’s reasoning.
Quick start: from licence to first scan
After your licence with the security flag is activated, here’s the
end-to-end path a new user follows:
- Sidebar appears. Log in, look for the shield-icon Security
entry in the left sidebar. If it’s missing, your account doesn’t
carry thesecuritygrant — see Permissions below. - Pick a starting tab. The default landing is Scanners (the
classic API fuzzer). For the AI flow open AI Agent instead. - Build a scan profile (AI Agent tab):
- Enter one or more target URLs (one per line — the form sends
up to 25 targets in a single bulk launch). - Pick personas (web / API / infra / mobile / cloud).
- Choose intensity:
passive(recon only),safe-active(default —
standard payloads),intrusive(active exploitation, each step
pause-gates), ordestructive(may modify data — requires
explicit written authorisation). - Set a cost budget in USD (default $5). The orchestrator stops
cleanly when reached. - Click Start scan.
- Enter one or more target URLs (one per line — the form sends
- Watch progress in the Runs Tray (floating panel) — security
scans appear with a shield-icon card and a progress bar. Click the
card to jump to the report. The Reports tab also auto-refreshes
every 5 seconds. - Approve intrusive steps in the Approvals sub-tab as the
dispatcher requests them. Each approval row carries the target,
scanner, and a free-text reason field — your decision is audited. - Read the report in the Reports tab: open the row to see
per-finding evidence, CVE/CWE links, reproducer curls, and
remediation guidance. Export via the toolbar buttons (SARIF / VEX /
HTML / PDF / Allure). - Merge multiple scans when you want one stakeholder report:
tick two or more reports, click Merge into one report in the
sticky toolbar, confirm the title. Findings dedupe by fingerprint.
Quick start: chat-driven scan via the AI agent
If you’ve configured an LLM profile (Admin → Agent Settings → LLM):
- Open the chat panel (bottom-right bubble).
- Say
scan our staging site https://example.comor
find vulnerabilities in our staging API. - The orchestrator routes to
red_team_lead, which asks
clarifying questions before launching anything:- “Which URLs or hosts should I test?”
- “Do you have written permission to test these targets?”
- “What intensity should I use: passive, safe-active, intrusive,
or destructive? The default is safe-active.” - “Is there anything I should avoid?”
- “Does the target require test credentials?”
- Answer in plain text. The agent recaps the parameters and asks
for final confirmation (“Start the scan?”). Replyyesorgo. - The scan starts. The agent surfaces approval prompts in the chat
for intrusive steps — replyapproveorrejectwith a reason. - Final report is dropped in the chat with the report ID; clicking
opens the full report view.
Deployment shapes
Mockarty supports three deployment modes for the security stack:
- Single-node (default): the admin process hosts the engine,
scanners, dispatcher, and approvals queue. No extra containers
required. Start Mockarty using the binary or Docker image; helm chart’s
single-node values for production. - Cluster (multi-node): scheduler / KB-feedback ingestion run
leader-only via PostgreSQL leader-election; approval rows + reports
live in shared PG so any node serves the UI; cross-node SSE pushes
finding events to the operator’s browser regardless of which node
ran the scanner. - + Security runners (optional Kali containers): when you want the
AI to delegate external-tool skills (network port scan, deep SQL-
injection, SMB / SSH / RDP audit, CIS Kubernetes benchmark, mobile
static analysis), bring up the bundled Kali runners with
docker compose --profile security up -d. They are opt-in and ship as
Docker images only. See The two runners and Deploying a runner
below for the full setup. Without any runner, the built-in scanners
still cover web / API / cloud-control-plane / contract / GraphQL /
gRPC / WebSocket use cases.
Scanning targets inside your own network
By default the Security Agent can only reach public addresses.
A target that resolves to loopback (127.0.0.1, ::1) or to a private
range (10.x, 172.16–31.x, 192.168.x, IPv6 ULA) is rejected twice:
once when the scan is admitted (the report ends up with the reason
“host is on the always-deny list”) and once at connection time, so a
host whose DNS answer changes between the two moments is refused as
well.
To audit your own internal estate, start Mockarty with:
ALLOW_PROXY_TO_PRIVATE_IPS=true ./mockarty
With the flag set, internal hosts are scannable exactly as public ones.
Cloud-metadata (169.254.169.254, fd00:ec2::254, 100.100.100.200)
and link-local addresses stay blocked either way — no scan profile can
point the scanner at an instance-credentials endpoint.
Leave the flag off for internet-facing deployments; that is the correct
default for a shared installation.
Permissions
securityis a seat-pool feature. The workspace
buys N Security seats; the admin grants them to specific operators in
Admin → Users → user → Features → Security. Same shape as
chaos/tcm/api-tester.- The Scanners sub-tab (fuzzing engine) is accessible with a
testing,
fuzz, orsecuritygrant. Other sub-tabs
(AI Agent, Reports, Approvals, Cost, Knowledge Base, Agent LLM profiles) require the
securityseat. - Admin / support roles can view the Security section in read-only
mode. Launching a scan, granting an approval, or
managing LLM profiles still requires an explicitsecurityseat — the
authoring operations burn a seat, the triage / browse operations don’t. - The Kali red-team-runner authenticates per-user at the admin-side
dispatch: a job from a user without an active Security seat is refused
before the runner ever sees it.
LLM profiles
The AI Agent + the LLM classifier consult an LLM profile per namespace.
Without a profile, the orchestrator falls back to heuristic-only mode
(scanners still run, but their findings aren’t AI-verified). Configure
under Admin → LLM Profiles → New.
Supported providers (pre-filled defaults in the create-profile UI):
| Provider | Default Base URL | Notes |
|---|---|---|
| OpenAI | https://api.openai.com/v1 |
GPT-4o / o1 |
| Anthropic Claude | https://api.anthropic.com |
Claude Opus 4 / Claude Sonnet 4 / Claude Haiku 4 |
| DeepSeek | https://api.deepseek.com/v1 |
V3 chat + R1 reasoner (OpenAI-compatible) |
| Azure OpenAI | https://<resource>.openai.azure.com |
Use deployment name as Model |
| YandexGPT | https://llm.api.cloud.yandex.net |
Service Account API key |
| GigaChat (Sber) | https://gigachat.devices.sberbank.ru/api/v1 |
OAuth2 client credentials |
| Ollama (local) | http://localhost:11434 |
No API key, bare BaseURL |
| Qwen (self-hosted) | http://qwen.internal:8000/v1 |
vLLM / sglang / Ollama gateway with OpenAI v1 wire shape |
| Custom | — | Any OpenAI-compatible endpoint |
Russian market guidance:
- DeepSeek API — primary cloud LLM for sub-agent tasks. Sign up at
platform.deepseek.com/api_keys, copy the key into the create-profile
form, default base URL is pre-filled. - Self-hosted Qwen 2.5 — primary on-prem LLM. Deploy Qwen 2.5 72B /
32B Coder behind a vLLM gateway (or sglang / Ollama), point the
profile at your gateway address. Six Qwen model IDs are pre-filled
in the dropdown (qwen2.5-72b-instruct down to 7b, plus
qwen2.5-coder-32b-instruct and QwQ-32B-Preview reasoning model). - YandexGPT — create a Service Account in Yandex Cloud, issue an
Api-Key, and paste it into the API key field. YandexGPT also needs
your Folder ID: add it under Parameters asx-folder-id. Pick a
model from the dropdown (yandexgpt/latestfor Pro,yandexgpt-lite/latest,
oryandexgpt-32k/latest); Mockarty builds thegpt://<folder>/<model>
URI for you. - GigaChat (Sber) — the API key is the Authorization key
(Base64(client_id:client_secret)) fromdevelopers.sber.ru/gigachat.
Mockarty exchanges it for a short-lived token and auto-refreshes it.
Set the access scope under Parameters asX-GigaChat-Scope:
GIGACHAT_API_CORP(pay-as-you-go) orGIGACHAT_API_B2B(prepaid) for
organisations,GIGACHAT_API_PERSfor individuals. GigaChat’s servers use
the Russian Trusted Root CA (НУЦ Минцифры): on a host that already trusts
that root it works out of the box; otherwise pointX-GigaChat-CA-Cert
(under Parameters) at the Минцифры PEM bundle, or set
X-GigaChat-Insecure-TLStotruefor dev/evaluation only.
When the provider doesn’t return token usage in the chat response
(some Ollama quantised builds, OpenRouter free-tier passthroughs, vLLM
without per-request usage counters), the cost tracker falls back to an
estimate. Estimated rows are flagged so you can tell them from
exact-usage rows.
- Standalone desktop builds do not surface the security module — the
sidebar entry is hidden in standalone Desktop builds. (The
module activates from the workspace licence at runtime; there is no
separate build flag.)
Where it lives
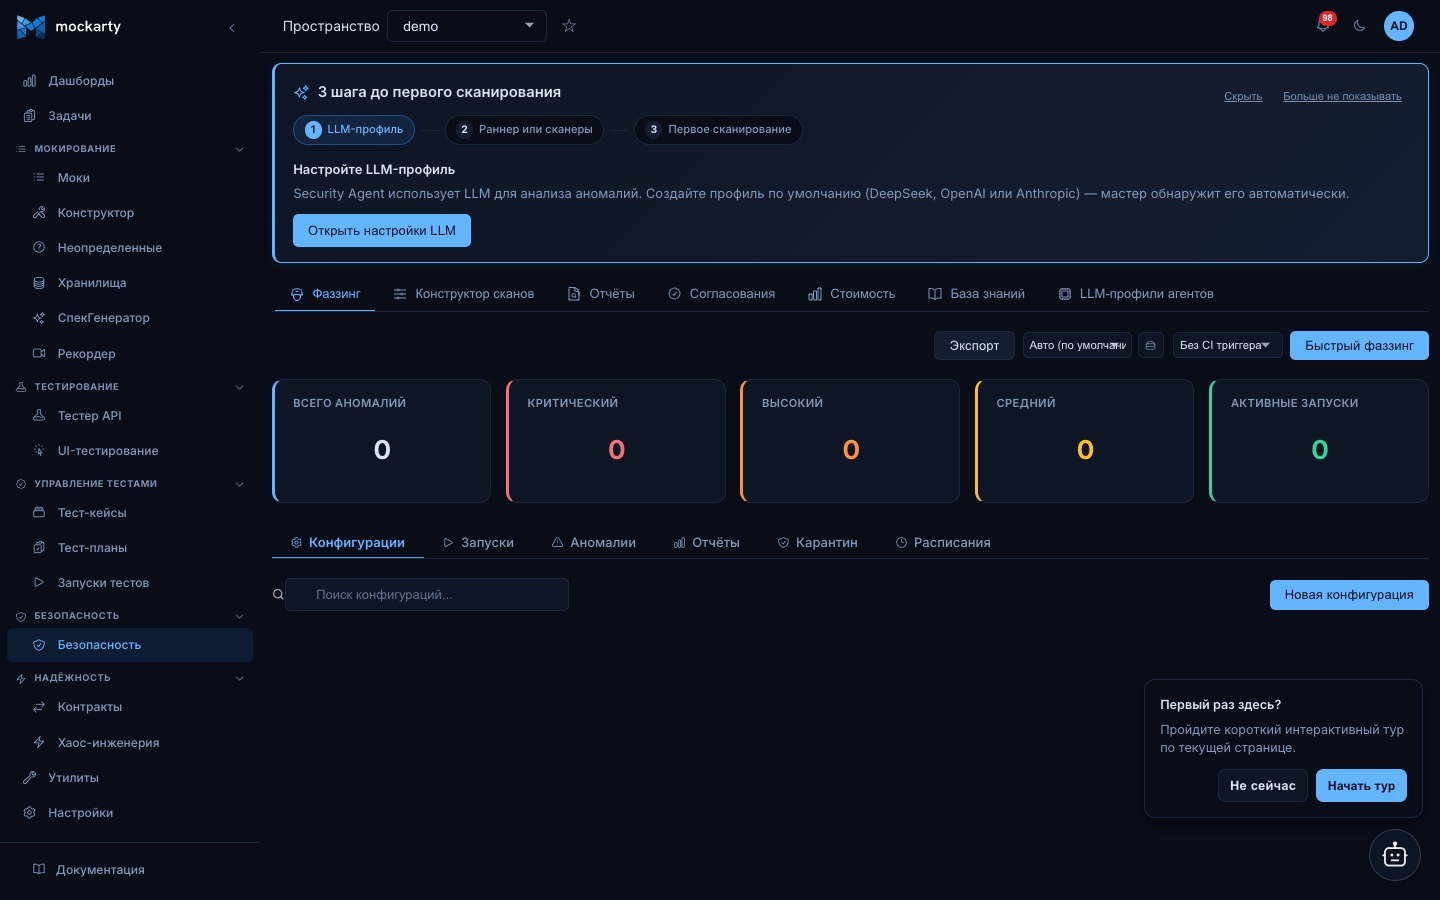
- Sidebar.
Security(shield icon). Replaces the standalone
“Fuzzing” entry; the legacy/ui/fuzzingroute is preserved as a
backward-compatible bookmark and lands on the same Scanners sub-tab. - URL.
/ui/securityopens the Scanners sub-tab by default.
Append?tab=ai-agent|reports|approvals|cost|kb|llm-profilesto deep-link. - API prefix. All Security Agent endpoints sit under
/api/v1/security/. Thesecuritylicence module controls access;
security_agentis an accepted older name for the same module.
Sub-tabs
1. Scanners
Embeds the existing API fuzzing UI verbatim. All previous fuzzing
features remain available: config CRUD, OpenAPI ingestion, payload
strategies (SQLi, XSS, SSRF, XXE, SSTI, mass assignment, CORS
mis-config, security headers, OWASP Top 10 batteries) and the run /
findings / quarantine views. The active-probe catalogue also includes
two advanced web-pentester checks that the AI orchestrator can
dispatch on demand:
- HTTP request smuggling (
scan_http_smuggling, CWE-444). Sends
CL.TE / TE.CL / TE.TE probe variants with deliberately ambiguous
Content-Length+Transfer-Encodingheader combinations. Flags the
target as high when the response carries both headers (frontend
and backend disagree on request boundaries) and critical when a
smuggled HTTP response line leaks into the body. - Insecure deserialization (
scan_insecure_deserialization,
CWE-502). Submits canonical Python pickle / Java serialized / PHP
serialized magic-byte payloads through three injection surfaces (body,
query parameter, custom header) and flags the target as critical
when the response shows a deserializer error signature
(pickle.UnpicklingError,java.io.InvalidClassException,
ObjectInputStream,unserialize(),__PHP_Incomplete_Class,
phar://). The scanner deliberately never sends a weaponised gadget
chain — confirming “the server reaches its language-native
deserializer for untrusted bytes” is enough to file the finding. - Time-based blind injection (
scan_blind_injection, CWE-89 / 78 /
943). Samples the baseline response time three times, takes the
median, then injects sleep payloads for SQL (MySQLSLEEP(3), MSSQL
WAITFOR DELAY '0:0:3', PostgreSQLpg_sleep(3)), NoSQL
({"$where":"sleep(3000)"}) and OS-command (; sleep 3 #)
families. Flags the target as high when the response is reliably
slower under the sleep payload than the baseline. Intrusive — each
probe ties up a worker on the target for ~3 s. CWE is selected per
payload family (SQL → CWE-89, command → CWE-78, NoSQL → CWE-943)
so triage routes to the right remediation playbook. - Stack trace leak (
scan_stack_trace_leak, CWE-209). Sends
payloads that are likely to crash a naive handler — NULL byte in
body, oversized integer, malformed JSON / XML, type-confusion
query — and matches the response against language-specific
patterns (Java / Spring, Python, PHP, .NET, Node, Ruby, Go). Files
one medium finding per distinct language so a polyglot
framework that leaks multiple stacks surfaces separate remediation
contexts. Safe-active intensity. - Filesystem path disclosure (
scan_path_disclosure, CWE-209).
Distinct from stack-trace leak: many apps disclose absolute paths
(/var/www/html/uploads/...,C:\inetpub\wwwroot\...,/Users/...)
through plain error JSON without any stack trace. Probes each
query parameter with confusion payloads (NUL byte, broken UTF-8,
oversized string, traversal sequences) and flags any of 16 known
path prefixes (POSIX, Windows, macOS, Docker/app/src/). Severity
bumps to medium on a server error plus a high-confidence match;
tuned to stay quiet on endpoints that legitimately serve file paths
so precision stays high. - Anomaly diff (
scan_anomaly_diff, CWE-707). Universal-coverage
baseline-mutate-compare net. Samples the target with the original
parameters to learn its normal response, then mutates each query
parameter with a battery of universal payload classes (NUL byte,
oversized string, RTL Unicode override, broken UTF-8, malformed
JSON, negative / huge int, raw SQL quote, CRLF injection,
format-string). Flags any response that drifts noticeably from the
baseline. Pairs every other scanner — catches anomalies that don’t
fingerprint as a known CWE class (one-off server errors, debug page
reveals, unexpected redirects). - PII leak (
scan_pii_leak, CWE-359). Passive scanner — issues
ONE request and matches the response body against curated PII
patterns. Covers US SSN, Luhn-validated credit cards (Visa / MC /
Amex / Discover prefix), IBAN, US + international phone, and the
Russian regulated triad: ИНН (10 / 12-digit), СНИЛС
(NNN-NNN-NNN NN), passport (NNNN NNNNNN). Critical for
152-ФЗ and GDPR compliance — a single passport disclosure is a
reportable incident. Email triggers only at 3+ matches to cut
false positives on contact-form pages. Findings carry redacted
samples (first 2 + last 2 chars) so the finding store itself
never propagates real PII.
All seven scanners are built in and run on the admin node — no runner
needed. The intrusive checks (smuggling, deserialization, blind injection)
pause-gate for human approval before each invocation (see the
Approvals sub-tab); the safe-active and passive probes
(stack trace, path disclosure, anomaly diff, PII leak) run
autonomously.
See the
API Fuzzing guide for the full reference; this is the
same engine, just relocated under the Security umbrella so that all
offensive tooling lives in one place.
2. AI Agent
Defines the scan profile that the orchestrator passes to the
pentest personas. A profile carries:
- The target — a base URL or a Mockarty namespace whose registered
endpoints become the attack surface. - The profile preset —
baseline(passive recon, no auth required),
authenticated(bring your own credentials) orfull(active
exploitation; may trigger WAF rules — only use against a target you
own).
Pressing Start scan launches the scan and immediately adds a new
entry to the Reports sub-tab. The scan runs in the background — switch
to the Reports tab to watch findings arrive in real time as each
persona completes its work.
3. Reports
GET /api/v1/security/reports?namespace=<ns> populates a paginated
list of historical scans. Each row exposes:
- The report ID — opens a detail view with per-finding evidence
(request/response transcripts, CWE / CVE links, exploitation
recipe). - The target the scan ran against.
- The status —
pending,running,complete,cancelled,
failed. - The findings count — total findings across all severities.
- The started timestamp.
Export formats are available per-report:
-
GET /api/v1/security/reports/{id}/export?format=sarif—
SARIF 2.1.0 (GitHub Code Scanning, Sonar, IDE plugins). -
format=vex— OpenVEX 0.2.0 (vulnerability disclosure metadata). -
format=html/format=pdf— human-readable reports. -
format=allure— Allure 2 launch JSON, one Allure test case per
finding. Lands in the same Allure surface the Test Plans and
TCM pipelines feed into, so a single Allure dashboard shows
functional results, contract checks and security findings side by
side. The mapping is:Mockarty severity Allure status Allure severity label critical failed blocker high failed critical medium broken normal low skipped minor info skipped trivial A discovered finding is always a failing test — Allure has no
“passed” semantic for a vulnerability that exists. CVE IDs become
issuelinks pointing at NVD; CVE / CWE / OWASP / KEV / CVSS are
surfaced as parameters; the finding’s evidence and reproducer curl
are attached astext/plainandtext/x-shellscriptblobs. Pipe
the response into the existing Allure receiver alongside your
functional and contract launches.
To cancel an in-flight scan: POST /api/v1/security/reports/{id}/cancel.
Cancellation requests the scan to stop; it does not mean its cleanup has already
finished. During graceful shutdown, Mockarty also waits for previously cancelled
local scans to finish their cleanup, within the shutdown time limit.
4. Approvals
Some scanners require an explicit human approval before they run —
typically active exploitation steps, destructive payloads, or actions
that touch out-of-scope hosts. The Approvals sub-tab calls
GET /api/v1/security/approvals?namespace=<ns> and lists every
pending request with its kind, target, requester and timestamp.
Each row exposes an Approve and a Reject button. Either
button issues
POST /api/v1/security/approvals/{id}/decide with the matching
{"decision":"approved"|"rejected"} payload. The orchestrator
resumes the scan as soon as the decision lands.
Decide a whole run at once. Rows group by run; Approve all /
Deny all issue a single
POST /api/v1/security/reports/{id}/approvals/decide request instead of
one call per gate.
Default approvers + routing. A namespace can designate default
approvers (the Approvals tab → Default approvers field, persisted via
PUT /api/v1/security/approval-settings). New pause-gates are then routed
to those reviewers — shown as Assigned to on the row, and each is pinged
(in-app bell + their channels). Only a member of the namespace may
decide a gate (an auditor-level role is enough — review is separate from
running a scan).
Optional auto-expiry. Set MOCKARTY_SECURITY_APPROVAL_TTL_MINUTES
(env, before startup; default off) so a gate nobody decides within the TTL
auto-expires (treated as denied) rather than pinning the report in
awaiting_approval forever. The sweep is leader-only in a cluster.
Optional N-of-M quorum. For separation of duties, require more than one
distinct approver before a gate releases. Set (env, before startup; default
1 = single approval) MOCKARTY_SECURITY_APPROVAL_QUORUM_DESTRUCTIVE and/or
MOCKARTY_SECURITY_APPROVAL_QUORUM_INTRUSIVE. With a quorum of 2, the first
approve records a vote and the row stays pending (the response reports
{approvals, required}); a second DISTINCT approver releases it. A single
reject kills the gate immediately regardless of quorum. Decide these
gates one row at a time — Approve all skips them (one actor can’t satisfy
N-of-M).
Pre-authorise an engagement (autonomy preset). At scan launch, the
Approval autonomy selector can pre-approve approval-required scanners up
to a chosen intensity ceiling for the run — so an intrusive engagement runs
without pausing per action, while the destructive tail still gates. Default
is Gate every action.
5. Knowledge Base
The Security Agent grounds its reasoning in a curated, offline knowledge
base. The corpus is indexed locally at startup and re-read on a six-hour
schedule (and on demand with Re-index now) — no live network calls are
made during a scan, so the agent runs just as well in fully air-gapped
deployments.
Indexed sources:
| Source | What it provides |
|---|---|
| NVD | National Vulnerability Database — CVE feeds, CVSS scoring, reference URLs. |
| CISA KEV | Known Exploited Vulnerabilities catalogue — prioritises actively-abused CVEs. |
| CWE | Common Weakness Enumeration — mapping from findings to weakness classes. |
| CAPEC | Common Attack Pattern Enumeration — attack-pattern taxonomy. |
| OWASP | Top 10, ASVS, Cheat Sheet Series — control checklists. |
| MITRE ATT&CK | Adversary tactics and techniques matrix. |
| MITRE ATLAS | Adversarial Threat Landscape for AI Systems — AI/ML attack-technique taxonomy. |
| Nuclei templates | Community-maintained scanner signatures. |
| Internal playbooks | Mockarty-curated pentest recipes (target reconnaissance, lateral movement, auth bypass, IDOR sweeps). |
Supplying the offline corpus (air-gapped). Set MOCKARTY_SECURITY_KB_FEEDS_DIR
to a directory and place the feed files there before startup — the agent indexes
each present file at boot: nvd.json, kev.json, attack.json (ATT&CK STIX),
atlas.json (ATLAS STIX), cwe.xml, capec.xml. The OWASP Top 10 is built in
(no file required). When the variable is unset the agent runs on per-namespace
custom documents and the manual refresh only — a small default install is not
taxed.
Re-indexing re-reads the same feed files from MOCKARTY_SECURITY_KB_FEEDS_DIR
that were loaded at startup and updates them in place: a changed document is
replaced, an identical one is skipped, so repeated clicks cannot grow the
corpus. With no feed directory configured there is nothing on disk to re-read,
and the action says so instead of pretending it re-indexed.
Custom documents. The Knowledge Base tab lets a workspace upload its own
documents (product specs, threat models, internal playbooks) — the agent
consults them before planning a scan. Removing a document is a decision the
workspace keeps: it stays out of the corpus after a restart or a re-index, and
a feed cannot re-add it, not even with changed content. The Removed
documents list shows who removed what and why; Restore puts a document
back and indexes it again. The same operations are available over the API:
POST /api/v1/security/kb/docs (upload), DELETE /api/v1/security/kb/docs/{id}
(remove, with an optional reason), GET /api/v1/security/kb/docs/suppressed and
POST /api/v1/security/kb/docs/{id}/restore.
In a multi-node cluster each node keeps its own search index of the corpus,
and an upload, removal or restore takes effect on every node at once: the node
that handled it tells the others, and they read the document from the shared
database. A node that was briefly disconnected from the cluster reloads the
whole corpus when it reconnects. Feed sources and re-indexing are configured
by the platform administrator via /api/v1/security/kb.
6. Cost
The Cost tab shows spending for Security scans, including a daily or hourly chart. Use it to check how much a scan has consumed before scheduling another run.
7. Agent LLM profiles
Use Agent LLM profiles to select the model connection used by the Security agent. See LLM profiles above for the supported providers and setup steps.
Permissions and licensing
- Sidebar visibility — a
fuzz,testing, orsecuritygrant can
open the Scanners tab. The other six tabs require asecurityseat.
Older configurations may call this modulesecurity_agent. - Per-tab access — the AI Agent, Reports, Approvals, Cost,
Knowledge Base, and Agent LLM profiles tabs require a Security seat.
API requests are checked separately from the visible tabs. - Historical artifacts — if your enterprise grant has lapsed,
read access to existing scan reports survives (write paths are
refused). This mirrors the platform-wide historical-data
preservation rule.
Built-in injection scanners
The built-in scanners include one per attack class.
The four scanners below cover the injection families that the SQLi /
command-injection / XXE / SSTI scanners do not — they cost nothing to
enable (no external runner needed) and run at the intrusive
intensity tier, so they pause-gate by default on every persona.
| Key | Persona | CWE | What it detects |
|---|---|---|---|
scan_nosql_injection |
web_pentester |
CWE-943 | MongoDB / Couchbase / DynamoDB / Redis operator-injection payloads ({"$ne":null}, {"$gt":""}, {"$where":"sleep(1000)"}, N1QL bypasses, Lua-termination). Triggers a finding when a document-store error surfaces in the response. |
scan_ldap_injection |
api_pentester |
CWE-90 | LDAP filter-metacharacter payloads (*)(uid=*))(|(uid=*, *)(&(objectClass=*). Triggers when a directory-server error surfaces in the response. Typically appears on auth / SSO / directory-search endpoints. |
scan_xpath_injection |
web_pentester |
CWE-91 | XPath-syntax-breaking payloads (' or '1'='1, or 1=1 or 'a'='a). Triggers when an XPath parser error surfaces in the response. Critical when the parser drives authentication / authorisation logic. |
scan_orm_injection |
web_pentester |
CWE-89 | SQL-syntax-breaking payloads with ORM-stack-trace fingerprints. Detects raw-SQL paths that reach the database through common ORM layers. The distinction matters because ORM-level injection can read across the full mapped object graph, not just the current table. |
Each scanner probes every URL query parameter on the target and stops
at the first confirmed match. Severity escalates to critical when the
response is a 5xx (a leaked unhandled exception) — otherwise high.
Each finding records the parameter, the payload used, the response
status, and the matched snippet, plus a ready-to-paste curl -i
reproducer.
Connecting external agents
The Security Agent ships with a set of built-in scanners that the admin
node runs on its own (HTTP probes, header checks, passive analyzers).
For tools that need a heavier runtime —
nmap, sqlmap, hydra and others that ship in the Kali toolchain —
Mockarty uses a runner binary (mockarty-redteam-runner) that runs
on a separate host and accepts dispatch tasks over A2A.
The two runners
Mockarty ships two runner images, both Kali-based. Run whichever tiers you
need:
mockarty/redteam-runner(port8500) — recon and scanning: network
port scans, deep SQL-injection probing, SSH / SMB audits, the Kubernetes
CIS benchmark, mobile static analysis, password spraying. This is the tier
most teams run.mockarty/exploit-runner(port8501) — the exploitation tier: it
turns a confirmed weakness into proof (for example, dumping data through a
SQL-injection, or forging a weak token). Every action here is
approval-gated by default (see Approvals). Run it only when you want
the agent to demonstrate impact, not just report it.
Both register themselves with the admin on boot and appear under Admin →
Remote Agents. Without any runner, the built-in scanners still
cover web / API / cloud-control-plane / contract / GraphQL / gRPC / WebSocket
testing.
Deploying a runner
You need two values, supplied through your .env (Compose) or the chart’s
secret (Helm):
- API token — issue one in the admin UI under Settings → API Tokens.
It identifies the runner to the admin node. - Registration secret — any sufficiently random string you choose. Use
the same value for every runner that should belong to your fleet. It
secures the link between the admin and its runners. It is not entered
anywhere in the UI — it lives only in the runner’s environment.
Docker Compose (recommended) — the runners sit behind the security
profile:
# .env
SECURITY_RUNNER_API_TOKEN=mk_...            # from Settings → API Tokens
SECURITY_RUNNER_SECRET=<choose-a-strong-secret>
SECURITY_RUNNER_NAMESPACE=production
docker compose --profile security up -d
This brings up both runners; they auto-register and show up in Admin →
Remote Agents within a few seconds.
Kubernetes (Helm) — enable redteamRunner (and, for the exploitation
tier, exploitRunner) in the chart and supply the same two values through
the chart’s secret.
Connecting behind NAT or in CI (pull-mode)
By default the admin pushes tasks to a runner, which requires the runner
to be reachable at its callback URL. When the admin can’t reach the runner —
it’s behind NAT, or it’s an ephemeral CI worker without a stable address —
switch the runner to pull-mode, where it asks the admin for work instead:
- redteam-runner: add
--pull-mode - exploit-runner: add
--pull
In pull-mode the callback URL is optional. For CI jobs that spin a runner up,
drain one batch of work, and tear down, bound the runner’s lifetime with
--max-tasks=N, --once (exactly one task), --drain (accept nothing new)
and/or --drain-after-idle=2m; the runner deregisters itself
and exits cleanly, so your “active runners” list never accumulates ghosts.
While a scanner is running, the runner renews the exact task lease it received.
If the lease expires or the task is reassigned, a late heartbeat or result from
the older attempt is rejected; it cannot overwrite the current scan outcome.
Securing the connection
- Keep runners on a trusted network and use HTTPS for the admin URL and
the runner’s callback URL in production, so the registration secret is
never sent in clear text. - Choose a strong, random registration secret and keep it in your secret
manager (Compose.env, a Kubernetes Secret, or a vault) — not in source
control. - Rotate it by changing the value and restarting the runner.
- Each runner serves a single workspace (
--namespace); the admin refuses
cross-namespace tasks.
Managing runners
Open Admin → AI & LLM → Remote Agents to see every registered runner, its status
(active / expired), and the skills it advertises. From there you can
temporarily disable a runner (the admin stops sending it work),
re-enable it, or remove it. A runner that stops responding is
automatically marked expired and skipped until it reconnects — no manual
clean-up needed.
Runner-provided scanners and exploit parameters
The Scan Profile Builder’s scanner list shows both halves of the catalogue: the
scanners built into the admin node, and the skills a registered runner
advertises. Runner rows carry a runner chip and only run while that runner is
online. They obey the same rules as in-process scanners — the profile’s intensity
ceiling skips anything above it, and an intrusive or destructive skill pauses the
scan in Approvals unless you pre-authorised that tier with the autonomy
preset.
An exploit skill also needs parameters — a Metasploit module, the vulnerable
param a sqlmap dump should act on. Two sources fill them:
executorOptionson the scan profile, keyed by scanner (for example
{"exploit_msf": {"module": "exploit/unix/ftp/vsftpd_234_backdoor", "payload": "cmd/unix/interact"}}).- The autonomous loop, which derives them from the findings it already has: a
SQL-injection finding supplies the parameter, a CVE finding supplies the module
when Mockarty knows one for that CVE.
A value you set yourself always wins over a derived one — your lhost is a
decision, a derived parameter is only a default.
Proof artifacts (opt-in). A finding’s evidence field is capped at a few
kilobytes, which is not enough for the dump, transcript or screenshot that proves
an exploitation result. With MOCKARTY_SECURITY_ARTIFACTS=on the runner uploads
those bytes and the finding carries a reference; the HTML report links it and the
download goes through the report route, namespace-scoped and authenticated. It is
OFF by default on purpose — the artifact behind an exploitation finding is often a
raw credential dump, so enabling it is a deliberate decision to store that class
of material in the platform’s blob backend (filesystem by default, S3-compatible
via the usual blob settings, with the same retention and access rules as other
attachments). With it off, the runner keeps sending text evidence and records why
the artifact is absent. A person opens the artifact from the HTML report; an agent
reads the same bytes with the security_get_finding_artifact tool, so the proof
is reachable from both the UI and an autonomous run.
Credential-bearing steps (lateral movement, further credential dumps, privilege
escalation checks) reference harvested credentials by an opaque handle rather
than carrying them: the material is held by a broker inside the exploit-runner
process, so it never reaches the task payload, the report, the exports or a
backup. Two consequences to plan around — a handle does not survive a restart of
that runner, and handles expire; in both cases the step fails with an explicit
“credential unusable” finding instead of attempting an authentication with
nothing, so a lost handle is visible rather than silent. The approval card shows the
exact parameters, so you approve a command, not a category. Mockarty never
invents an attacker address: a module that needs one is named without it, and the
executor refuses to run rather than dial a host nobody chose.
Running an exploitation engagement
Everything the exploitation tier needs is reachable from the Scan Profile
Builder: set Intensity tier → Destructive, tick the exploit skills you want in
the scanner allow-list (they appear with a runner chip and need an online
exploit-runner), and put the tool parameters in Tool parameters (JSON) — for
example a Metasploit module and payload, or a sqlmap target parameter. Leave
Approval autonomy on Gate every action and each destructive step pauses for
your sign-off with its exact parameters shown; choose Full autonomy to
pre-authorise that tier for the run.
Autonomous, unattended paths deliberately stop below it. A mission’s
deep-security pass skips every destructive skill, and a scan launched by an agent
cannot grant itself the destructive tier — so a data-modifying tool never runs
without a named human decision. When a run has to reach the exploitation tier, a
person starts it.
UI walkthrough
The Security section has three task-driven tabs, plus the existing
Scanners and Knowledge Base tabs:
- Sidebar → Security. Opens the Security area.
- Scan Profile Builder. Fill in the target (base URL or
namespace), pick a persona, narrow the scanner allow-list,
pick an intensity tier, set a cost budget if desired, and press
Start scan. The form POSTs to/api/v1/security/scansand
redirects to the new report’s detail view. - Reports. Click a report row to open the detail view. The page
live-polls status, shows findings as they arrive, renders the
attack chain graph, and exposes the four report exports
(SARIF / VEX / HTML / PDF). - Approvals. Review every pause-gate decision the orchestrator
has flagged for human review — typically intrusive or destructive
scanner intensities. Approve or reject; the scan resumes as soon
as the decision lands.
Runner configuration reference
Both runners take the same connection flags; each also has a MOCKARTY_*
environment-variable equivalent (handy for Compose / Helm, which inject
config as env). The common settings:
| Flag | Env var | Default | Purpose |
|---|---|---|---|
--admin-url |
MOCKARTY_ADMIN_URL |
(required) | Base URL of the Mockarty admin node. |
--api-token |
MOCKARTY_API_TOKEN |
(required) | API token that identifies the runner to the admin. |
--namespace |
MOCKARTY_NAMESPACE |
(required) | Workspace this runner serves; the admin refuses cross-namespace tasks. |
--registration-secret |
MOCKARTY_REGISTRATION_SECRET |
(required) | The shared secret you chose (see Deploying a runner). |
--callback-url |
MOCKARTY_CALLBACK_URL |
(required in push-mode) | Where the admin reaches this runner. Optional in pull-mode. |
--workers |
— | 4 |
Maximum concurrent tool executions. |
--allowed-tools |
MOCKARTY_ALLOWED_TOOLS † |
empty (all) | Comma-separated allow-list of tools (e.g. nmap,sqlmap). |
--labels |
MOCKARTY_LABELS † |
empty | Selector labels (e.g. region=eu) the admin can target by. |
--max-tasks |
— | 0 (unlimited) |
Exit after this many tasks — for ephemeral CI workers. |
--once |
MOCKARTY_RUNNER_ONCE |
false |
Run exactly ONE task, then deregister and exit 0 (CI one-shot). Same as --max-tasks=1; cannot be combined with --max-tasks. |
--drain |
MOCKARTY_RUNNER_DRAIN |
false |
Accept NO new tasks (dispatch and lease work is refused), finish in-flight scans, deregister and exit 0. |
--drain-after-idle |
— | 0 (off) |
Exit after this idle period (e.g. 2m) — for CI jobs. |
--healthz-addr |
— | :8500 ‡ |
Listen address for the /healthz probe. |
--dry-run |
— | false |
Print the resolved config and exit. |
Redteam vs exploit differences:
- Pull-mode flag: the redteam-runner uses
--pull-mode, the exploit-runner
uses--pull. - The exploit-runner’s
/healthzdefaults to:8501(‡), and its
allow-list / label environment variables are EXPLOIT-prefixed (†):
MOCKARTY_EXPLOIT_ALLOWED_TOOLSandMOCKARTY_EXPLOIT_LABELS. --runner-name(MOCKARTY_RUNNER_NAME) applies to the redteam-runner
only; the exploit-runner registers under its container hostname.
Notification channels
Every finding that is persisted to the report is also evaluated
against a severity threshold (default high). When the threshold is
met, the finding is forwarded to the
platform’s existing notification fabric — the same one Test Plans,
performance tests, and fuzzing use for Slack / Telegram / email /
webhook / Discord / Teams / Mattermost.
Routing is done through the standard Channel Bindings UI; there is no
security-specific configuration step.
- Open Admin → Notification Channels and create the transport
you want findings delivered to (Telegram bot, Slack webhook,
corporate email server, generic webhook URL, etc.). - In the same UI, create a Channel Binding for the channel with
the event type set tosecurity.finding.recorded. Bindings can be
scoped per-namespace so prod findings reach the on-call channel
while staging findings land in a quieter room. - Run a scan. Every finding with severity
highorcriticalfires
one event into the binding. The default channel template renders
the title, severity, target, scanner key, and a deep-link back to
the report’s detail page. Admins can override the template per
(event, channel, language) in Notifications & channels → Message Templates.
Lower severities (info, low, medium) are intentionally not
forwarded — operators see them in the report’s findings table but
never on Slack/Telegram. This matches the rest of Mockarty’s noise
policy: alerts only when something likely needs human triage.
If the channel send fails (transport down, rate-limited, circuit
breaker open), the failure is logged and the finding remains visible
in the report — channel delivery is best-effort and never blocks the
scan.
MCP tools
When the security_agent feature is licensed, the admin’s MCP server
publishes the Security Agent tools below to authenticated MCP clients (AI
chats, sub-agents, scripted automations). Tool names are stable and
gated by the same feature flag as the UI / REST surface.
security_list_agents— list the remote A2A scanner runners
registered for the caller’s namespace. Returns one row per agent
withid,name,status,capabilities,lastHeartbeatAt,
callbackUrl. No required arguments (namespace is auto-resolved
from the caller’s pinned namespace).security_list_scanners— list the built-in scanners.
Each row carrieskey,persona,intensityso a
caller can pick a scanner before kicking off a scan.security_start_scan— start a full scan profile. Required
arguments:title(human label) andprofile(aScanProfile
JSON object —scopeDescription,intensity,targets, plus
optional cost / rate caps). Returns the createdreportrow;
the scan itself runs in the background.security_get_report— fetch one report byreportId. Returns
status, profile, cost counters, and thestartedAt/completedAt
timestamps.security_list_findings— return every finding attached to a
report. Required:reportId. Each row carries severity, CVE / CWE
/ OWASP IDs (when applicable), evidence, a reproducer curl, and
the suggested remediation.security_get_finding_artifact— fetch the proof artifact
attached to one finding (the full dump, tool transcript or scan
output the evidence field only summarises). Required:reportId
andfindingId. Returns{ref, filename, size, encoding, content, truncated}— text inline asutf-8, binary asbase64, large
artifacts truncated withtruncated:true(sizeis the full byte
length). Returns a 404 when the finding has no stored artifact and a
503 when the deployment did not enable artifact storage. This is the
agent path to the same bytes a person downloads from the report.security_export_report— render a report in a portable
format. Required:reportIdandformat(sarif|vex|
html|pdf|allure). The raw rendered bytes are returned
with the server-setContent-Typeheader.allureemits one
Allure 2 launch JSON document so the findings join the same
Allure surface the Test Plans / TCM pipelines feed into.security_decide_approval— approve or reject a pause-gated
step that the orchestrator flagged for human review. Required:
approvalIdanddecision(approve|reject). Optional
reasonis stored on the approval row for audit.security_triage_finding— mark one finding asconfirmed/
false_positive/duplicate/wont_fix/resolved(or back
toauto). Required:findingIdandstatus. Optionalnote
carries the operator’s rationale into the audit trail. Use after
security_list_findingsto silence known false positives or close
a finding as resolved post-fix. The REST equivalents are
POST /api/v1/security/findings/{id}/triageand
POST /api/v1/security/findings/triage-bulk(body
{ids, status, note?}for the bulk variant).
The following tools round out the set for automation and reporting
workflows:
security_list_reports— list recent reports in the namespace
(id, title, status, finding counts) so a client can find a report
before fetching it.security_bulk_scans— launch several scans in one call (one per
target) — useful for sweeping a list of hosts from a script.security_cancel_report— stop an in-progress scan.security_merge_reports— combine several reports into one
consolidated report.security_dedupe_findings— collapse duplicate findings within a
report.security_kb_search— search the Knowledge Base of past
confirmed findings (see the Knowledge Base tab). Every hit names the
corpus it came from (corpus,security_kbfor this knowledge base),
and an optionalcorpusargument narrows the search to one corpus:
security_kb,product_context(documents that describe the product)
orexperience(what earlier runs found out). Any other value is
rejected with a message naming the known ones.security_save_template/security_load_template— save a
scan profile as a reusable template and load it back when starting a
new scan.
Every tool enforces per-namespace authorisation through the same
RBAC + audit pipeline as the REST endpoints, so an MCP client cannot
read a report owned by a different workspace even if it knows the ID.
Prometheus metrics
The Security Agent and the A2A peer registry expose Prometheus
collectors on the standard /metrics endpoint. Every collector
carries the platform-wide const labels node_id, environment and
version so multi-node aggregations work out of the box.
Counters
| Metric | Labels | Meaning |
|---|---|---|
mockarty_security_scan_started_total |
namespace, persona |
A red_team_lead run was started. |
mockarty_security_scan_completed_total |
namespace, status (done / failed / cancelled) |
A run reached a terminal status. |
mockarty_security_finding_recorded_total |
namespace, severity, persona |
A finding was persisted after classifier + scope checks. |
mockarty_security_cost_limit_reached_total |
namespace, scope (run / namespace) |
A cost cap tripped. |
mockarty_security_pull_runner_tool_total |
namespace, tool, outcome (success / failed / timeout / cancelled / skipped) |
Per-tool invocation counter reported by pull-mode runners in their /result payload. |
Histograms
| Metric | Labels | Meaning |
|---|---|---|
mockarty_security_scan_duration_seconds |
namespace, status |
End-to-end run duration. Buckets: 1s → 1h. |
mockarty_security_dispatch_latency_seconds |
namespace, outcome (success / failure / timeout) |
Round-trip latency of a remote A2A scan dispatch. Buckets: 50ms → 60s. |
mockarty_security_pull_round_trip_seconds |
namespace |
Enqueue → Complete wall clock for pull-mode tasks (admin-observed; includes queue wait + runner execution). Buckets: 100ms → 10min. |
mockarty_security_pull_runner_exec_seconds |
namespace, tool |
Runner-side subprocess wall time for one tool, reported by pull-mode runners. Pair with the round-trip histogram to spot queue saturation (round_trip ≫ exec ⇒ admin queue is backed up). Buckets: 50ms → 30min. |
Gauges
The gauges are refreshed every 15 seconds by a leader-only background
job that reads the registry + the pending-approvals queue.
| Metric | Labels | Meaning |
|---|---|---|
mockarty_a2a_active_agents |
namespace |
Count of A2A peers currently in status=active. |
mockarty_a2a_expired_agents |
namespace |
Count of A2A peers currently in status=expired. |
mockarty_security_pending_approvals |
namespace |
Count of approval requests still in decision=pending. |
mockarty_security_pull_queue_depth |
agent_id |
Per-agent backlog of pull-mode tasks awaiting lease. A sustained value above zero signals the runner is offline or saturated. |
Typical Grafana queries
Findings per minute, by severity:
sum by (severity) (rate(mockarty_security_finding_recorded_total[5m])) * 60
p95 scan duration, by status:
histogram_quantile(0.95, sum by (le, status) (rate(mockarty_security_scan_duration_seconds_bucket[10m])))
Remote-dispatch error budget — fraction of failed dispatches in the
last 30 minutes:
sum(rate(mockarty_security_dispatch_latency_seconds_count{outcome!="success"}[30m]))
/
sum(rate(mockarty_security_dispatch_latency_seconds_count[30m]))
Approval queue length by namespace (alert when persistently > 5):
max by (namespace) (mockarty_security_pending_approvals)
Cost-cap trips per hour (any non-zero value is worth investigating —
either capacity is mis-sized or an automation is hammering the agent):
sum by (namespace, scope) (rate(mockarty_security_cost_limit_reached_total[1h])) * 3600
CI/CD: starting scans from scripts
The CLI and SDKs expose only the operator-friendly surface — start a
scan, poll status, list findings, download SARIF/HTML/PDF, list
scanners, cancel a scan. Admin operations (LLM profile editing, agent
on/off, scanner templates) live in the admin UI.
CLI (mockarty-cli)
mockarty-cli security list-scanners --namespace prod
mockarty-cli security start-scan --namespace prod \
    --target https://api.example.com \
    --persona web_pentester --intensity passive
# → "Scan started: 8f3a... (status=running)"
mockarty-cli security get-report 8f3a...
mockarty-cli security list-findings 8f3a... --severity high
mockarty-cli security export 8f3a... --format sarif -o scan.sarif.json
mockarty-cli security list-agents --namespace prod
mockarty-cli security cancel 8f3a...
Go SDK
client := mockarty.NewClient(os.Getenv("MOCKARTY_URL"),
    mockarty.WithAPIKey(os.Getenv("MOCKARTY_API_KEY")))
rep, _ := client.Security().StartScan(ctx, mockarty.StartScanRequest{
    Title: "ci-nightly", Namespace: "prod",
    Profile: mockarty.SecurityScanProfile{
        Intensity:        "passive",
        ScopeDescription: "https://api.example.com",
        Targets: []mockarty.SecurityTarget{{URL: "https://api.example.com"}},
    },
})
sarif, _ := client.Security().ExportReport(ctx, rep.ID, "sarif")
_ = os.WriteFile("scan.sarif.json", sarif, 0o644)
Full example: sdk/go-sdk/examples/security_scan/main.go.
Python SDK
from mockarty import MockartyClient

with MockartyClient(namespace="prod") as c:
    rep = c.security.start_scan(
        namespace="prod", target="https://api.example.com",
        persona="web_pentester", intensity="passive")
    # ... poll c.security.get_report(rep["id"]) until terminal
    sarif = c.security.export_report(rep["id"], format="sarif")
    open("scan.sarif.json", "wb").write(sarif)
Full example: sdk/py-sdk/examples/security_scan.py.
Java SDK
try (MockartyClient c = MockartyClient.builder()
        .baseUrl(System.getenv("MOCKARTY_BASE_URL"))
        .apiKey(System.getenv("MOCKARTY_API_KEY"))
        .namespace("prod").build()) {
    Map<String, Object> rep = c.security().startScan(
        "prod", "https://api.example.com",
        "web_pentester", "passive", "ci-nightly");
    byte[] sarif = c.security().exportReport((String) rep.get("id"), "sarif");
    Files.write(Path.of("scan.sarif.json"), sarif);
}
Full example: sdk/java-sdk/examples/src/main/java/ru/mockarty/examples/SecurityScanExample.java.
What’s new in v1.1
Live per-scanner sub-progress
The report-detail panel now shows two stacked progress bars while a
scan is in flight:
- Plan progress — the orchestrator’s “scanner N of M” counter,
labelled by the persona currently running (“Persona: api_pentester”). - Scanner sub-progress — the active scanner’s internal counter
(“scan_sqli — payload 1247 / 5000”). Long-running scanners report
their progress in real time; the bar refills as the scanner walks
its payload list and resets when the next scanner picks up.
The bars are SSE-driven (/api/v1/events?subscribe=security_progress),
so they update in real time without polling. The 3 s polling fallback
kicks in automatically if the SSE connection drops — a small inline
notice tells the operator the bar will catch up on the next refresh.
CVE alert (KEV / CVSS-bump notifications)
A leader-only scheduler walks the namespace’s past findings on every
tick (default 1 h) and watches each unique CVE for two transitions
in the knowledge base:
- Newly added to CISA KEV —
KEV=false → true. Renders as a
Critical synthetic finding with title “{CVE} added to CISA KEV
catalogue”. - CVSS score increase ≥ 1.0 — the KB re-scored the CVE upward.
Renders as a High synthetic finding with the score delta.
Each transition fans out exactly once per (namespace, cveID) pair —
duplicate alerts on subsequent ticks are suppressed automatically.
The alerts surface through the same per-namespace
notification channels (Telegram / Slack / email / webhook) the
finding-recorded pipeline uses; the Scanner field is stamped
cve_alert so channel-side rules can filter them.
“Find similar past findings” in the finding modal
Opening a finding now shows a Find similar past findings button.
Clicking it queries GET /api/v1/security/kb/similar with the
finding’s (title, scanner, cwe) triple and renders the top KB hits
inline. A checkbox toggles whether to include past-findings from the
current namespace or restrict to the curated catalogue (NVD / CWE /
OWASP) — useful when triaging a brand-new finding where prior
workspace bugs aren’t relevant.
Compare to previous scan (baseline diff)
The report-detail toolbar gains a Compare to previous button. It
picks the most recent terminal report in the same namespace that
isn’t the current one and POSTs /api/v1/security/reports/diff,
rendering the result as a compact modal:
- New findings — fingerprints in current but not in baseline
- Fixed (gone) — fingerprints in baseline but not in current
- Unchanged — present in both
- Untargeted — findings without a Target (workspace-wide warnings;
not comparable across runs)
Findings are matched by a stable fingerprint of the finding’s
identity (scanner, target, and vulnerability class), so trivial
run-to-run rewordings don’t break the diff.
Agent tasks panel
Agent tasks open from the queue badge in the header into a panel; there is no
standalone page for them. The panel aggregates every AI-agent task across sub-agents (security, code-review,
TCM-drafter, …) into one filterable list: filter by status, cancel running tasks, open
the agent transcript. The Tasks page (/ui/tasks) shows the same activity beside
tracker issues, and scans launched from chat carry an agentTaskId link so the Reports
tab and the tasks panel surface the same work from two angles.
Knowledge Base “Re-index now”
The KB tab has a Re-index now button (admin-gated). It re-reads the
operator’s feed files (MOCKARTY_SECURITY_KB_FEEDS_DIR) and updates the index
in place, without waiting for the scheduler’s next tick. Repeated clicks are
safe: a document whose content did not change is skipped and a changed one
replaces its previous version, so the catalogue never grows. With no feed
directory configured the action reports that there is nothing on disk to
re-read.
Choose what to scan
In Scan Builder, select at least one persona. Select individual scanners
to narrow the run; if you leave the scanner list empty, Mockarty runs all
scanners available to the selected personas. Automated profiles can make the same choice
with allowedPersonas and allowedScanners.
Track scan cost
The Cost tab charts daily or hourly spending in USD. Hover over a bar to
see how many runs contributed to it.
Ask the security agent
Open the floating chat or click Try in chat in Scan Builder. For example:
- “Scan
https://staging.api.acme.com.” The agent asks for authorisation,
intensity, and exclusions before an intrusive run. - “Show active scans” or “Cancel the scan against
api.acme.com.” - “Start a basic scan against these 10 hosts.” One request can start up to
25 scans.
If a scan needs approval before a more intrusive step, the chat presents the
request for your decision.
Related guides
- API Fuzzing — the engine that powers the
Scanners sub-tab. - Knowledge Base (RAG) — the same RAG layer
re-used for the Security Agent corpus. - Security & Compliance — platform-wide
controls (audit log, PII at rest, KeyStore, SIEM export). - Threat Model (STRIDE) — Mockarty’s own threat
model; the Security Agent is intentionally scoped to scanning user
targets, not the Mockarty install itself.